立场:这篇文章不是 README 翻译,也不推销产品。我会先把 CopilotKit + AG-UI 放进 AI Agent 开发栈的坐标系,再说它和 Vercel AI SDK、LangChain、LangGraph、Agno 等 agent framework 的边界;然后深入到具体组件、协议事件、Generative UI 的三种 spec、HITL 的两种 pattern、State streaming;最后给两个能直接跑的 demo:一个 Built-in Agent(10 分钟),一个 CopilotKit 前端 + LangGraph backend(30-60 分钟,看协议层真正的力量)。 全部事实查证日期:2026-06-16。
0. 动机:为什么 agent 落地这么难
你可能已经跑过这样的 demo:在 LangGraph 里把 React agent、search tool、summarize tool 串成一个 state graph,命令行里问”今天北京天气怎么样,适合去哪”,agent 自己规划、call tool、给答案。一切顺利。
但要把同一个 agent 嵌进你真正的产品里——比如一个 SaaS 后台、一个 Notion-like 的编辑器、一个 SaaS spreadsheet——你立刻会遇到一堆没在 LangGraph 里考虑过的问题:
- 用户的”上下文”是当前打开的那条记录、那个表格、那张图。agent 怎么读到?
- 工具调用(tool call)是一个 JSON,但用户要看的是一个真正的按钮、表格、地图、form。怎么让 agent 渲染真的 React 组件,而不是让前端去 parse JSON?
- 高风险操作(发邮件、扣款、删除数据)必须有人类批准。agent 怎么在 graph 中间停下来,弹一个真实的确认 UI?
- 用户改了一个表单字段,agent 的下一步规划需要看到。React state 和 agent state 怎么双向同步?
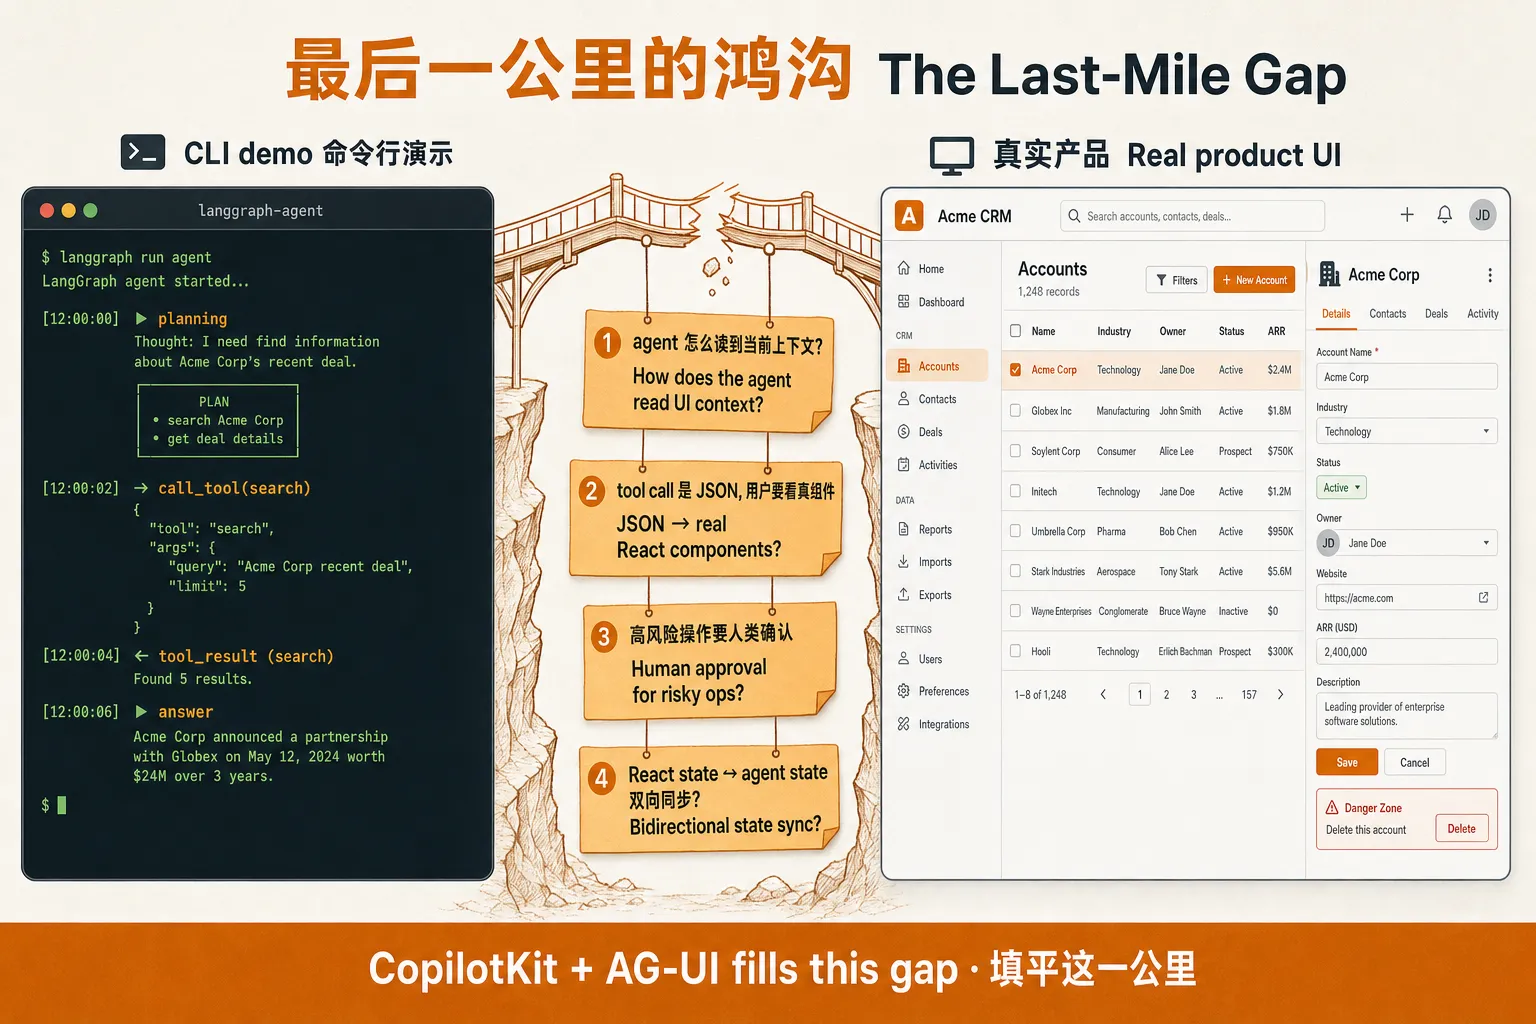
这就是 CopilotKit 要解决的最后一公里。它不是 agent 框架(不是 LangChain 替代),不是底层 SDK(不是 Vercel AI SDK 替代),而是Agent ↔ User这一层的协议 + React 工具链。
要理解为什么需要单独抽出来这一层,先把整个 AI Agent 开发栈画出来。
1. 坐标系:AI Agent 开发栈的 5 层
把一个 agent 从 LLM 串到”用户正在操作的界面”,中间隔着几件事:
flowchart TB
  L1["L1 Model Layer<br/>GPT-5.4 / Claude Opus 4.6 / Gemini 2.5<br/>+ 多模态 / 长 context / reasoning"]
  L2["L2 Protocol Layer<br/>MCP (model↔tools)<br/>A2A (agent↔agent)<br/><b>AG-UI (agent↔user)</b>"]
  L3["L3 Orchestration Layer<br/>LangGraph / Agno / CrewAI / Mastra / AutoGen / Pydantic AI"]
  L4["L4 Tool & Integration Layer<br/>Function calling / RAG / SQL / Browser / Code execution"]
  L5["L5 UI & Application Layer<br/>React / Vue / Angular / Mobile / 业务组件库"]
  S["<b>CopilotKit 跨 L2 + L5</b>"]
  L1 --> L2 --> L3 --> L4 --> L5
  S -.跨.-> L2
  S -.跨.-> L5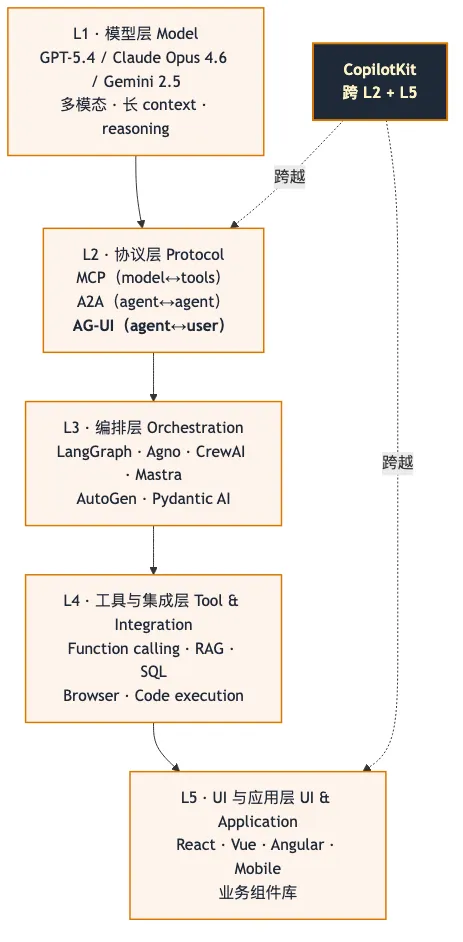
每层都有自己的代表项目:
| 层 | 职责 | 代表项目 |
|---|---|---|
| L1 Model | 调用、计费、context 管理 | OpenAI / Anthropic / Google / 国内各家 |
| L2 Protocol | 标准化的跨进程通信 | MCP(Anthropic)/ A2A(Google)/ AG-UI(CopilotKit) |
| L3 Orchestration | state graph、agent 循环、tool 选择 | LangGraph、Agno、CrewAI、Mastra、AutoGen、Microsoft Agent Framework |
| L4 Tool | 单个工具的实现 | function-calling、browser-use、SQL connectors |
| L5 UI | 把 agent 的输出和操作者接起来 | React 组件、状态管理、表单库 |
CopilotKit 跨 L2 + L5——它定义了 L2 的协议(AG-UI)并提供了 L5 的 React 工具链。它不抢 L3 的 orchestration 位置,所以 LangGraph、Agno、Mastra 这些 L3 框架都可以作为它的 backend。
这一点决定了 CopilotKit 和 Vercel AI SDK 的关系:Vercel AI SDK 是 L3 + L4 之间的”模型/工具调用 SDK”,可以独立用,也可以被 CopilotKit runtime 拿来作为 L3 backend;而 assistant-ui 是一个 L5 优先的 headless 组件库;CopilotKit 在这三者里跨 L2 + L5,定位最重。
2. CopilotKit 是什么
一句话定义:CopilotKit 是一个 full-stack 的 Agent 前端框架,外加它定义和维护的开源协议 AG-UI(Agent–User Interaction Protocol)。它解决”如何把任何 L3 agent framework 接到真实 React 应用”这个问题。
截至 2026-06-16 的可验证数据:
| 指标 | 数据 | 来源 |
|---|---|---|
| GitHub stars | 35.2k | https://github.com/copilotkit/copilotkit |
| Dependents | 1.7k | 同上 |
| Contributors | 184 | 同上 |
| License | MIT | 同上 |
| 当前版本 | v1.60.1(2026-06-12 发布) | GitHub releases |
| 协议层 | AG-UI v2026.06.15(3 小时前刚发) | https://github.com/ag-ui-protocol/ag-ui |
| AG-UI stars | 14.3k | 同上 |
维护方是 CopilotKit Inc.,创始人是 Atai Barkai,团队是 Y Combinator W23。
CopilotKit 实际包含两个项目:
copilotkit/copilotkit— React 组件 + 运行时 + 各种 framework 集成,MITag-ui-protocol/ag-ui— 协议规范 + 多语言 SDK(Python / TS / Dart / Kotlin / Java / Go),MIT
这是两个独立 repo。AG-UI 是协议,CopilotKit 是协议的首批 reference implementation + 商业扩展(Copilot Cloud)。
3. AG-UI 协议:agent↔user 通信的”行业标准”
3.1 为什么要单独搞一个协议
在 AG-UI 出现之前,每个 agent framework 都要自己实现”前端怎么调用我、我的 stream 怎么推给前端、tool call 怎么回流”。结果就是:
- LangGraph 推 SSE 给你一个 event stream
- Mastra 用它自己的 transport
- CrewAI 有它自己的格式
- Agno 又不一样
每个 framework 都要在前端重新写一遍 client。CopilotKit 的判断是:agent 和前端之间的 wire format 应该是一个标准协议,就像 HTTP 是 server-client 之间的标准一样。这就是 AG-UI。
3.2 AG-UI 在协议版图里的位置
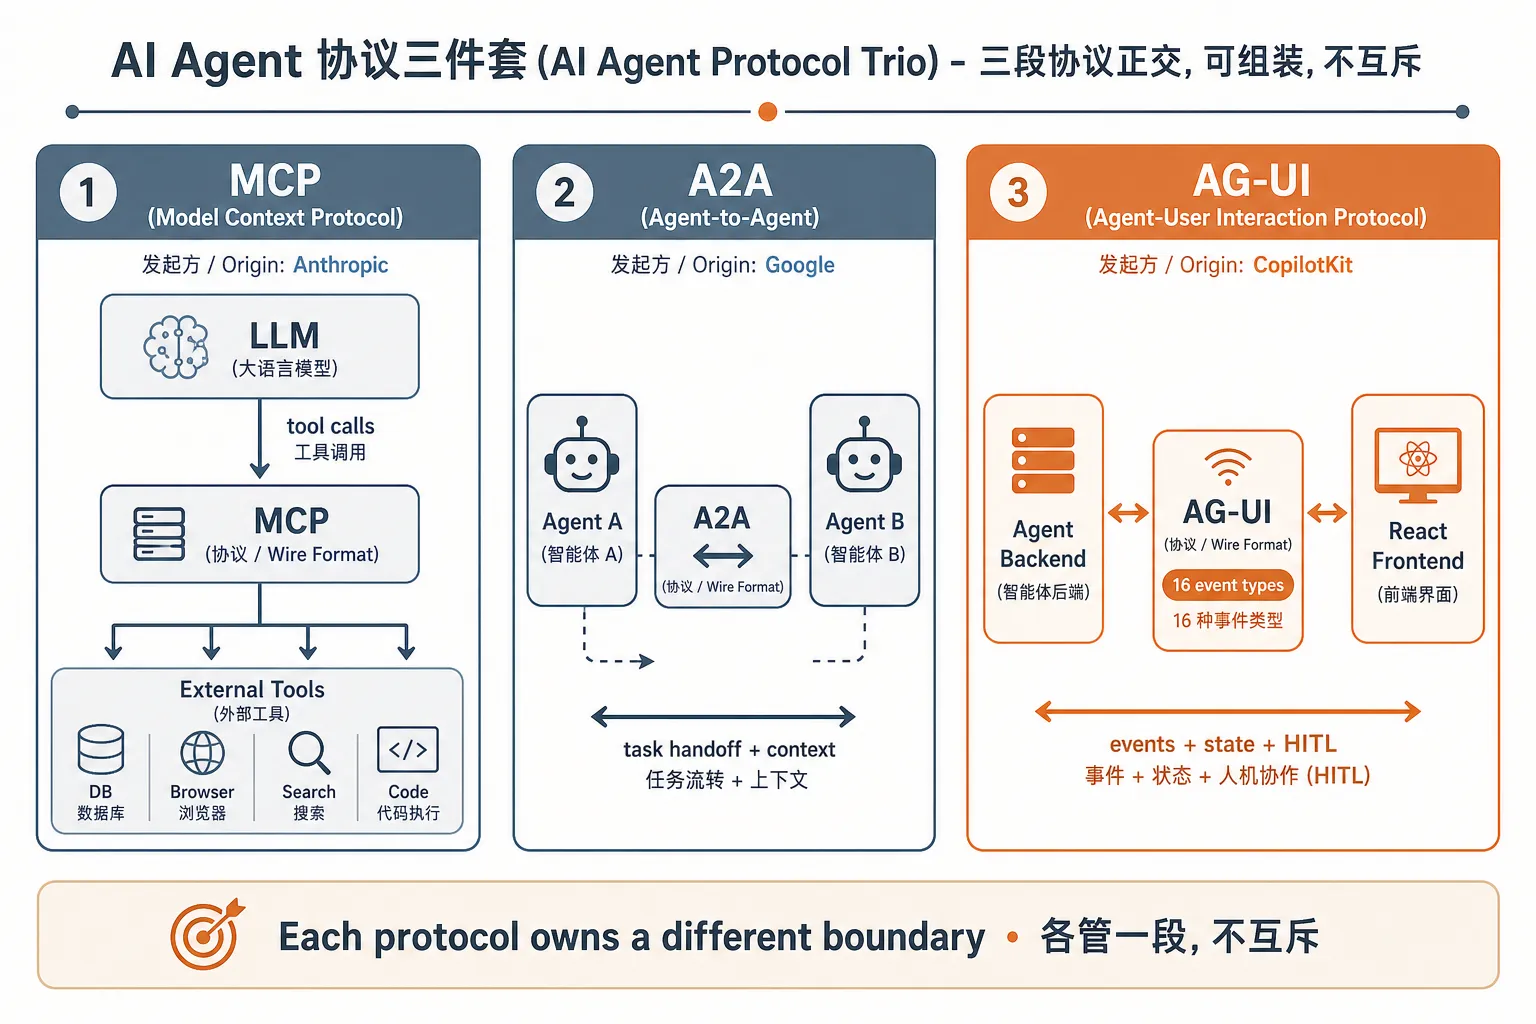
三段协议各管一段:
- MCP(Anthropic 提出):model / agent 怎么调用外部 tool。
- A2A(Google 提出):agent 和 agent 之间怎么交接任务、传上下文。
- AG-UI(CopilotKit 提出):agent 和前端 / 用户之间怎么通信、共享状态、请求人类输入。
它们正交——不是替代关系,是组装关系。AG-UI 在协议描述里直接说”while MCP and A2A handle context and coordination, AG-UI defines the layer between the user, application, and agent”。
3.3 容易混淆:A2UI ≠ AG-UI
Google 2025-12 推出 A2UI(Agent-to-UI),和 AG-UI 名字像但定位不同:
- A2UI 是一份 generative UI 规范——agent 输出某种 JSON spec,前端按 spec 渲染 widget。偏静态、声明式。
- AG-UI 是一个 双向 runtime 协议——16 个 streaming event type、状态共享、HITL、interrupt。偏动态、运行时。
CopilotKit v1.50 之后同时支持 A2UI 和 AG-UI(再加上 MCP Apps 和 Open-JSON-UI),意味着你可以用 AG-UI 做 runtime transport,用 A2UI 做 generative UI 的输出格式,二者不冲突。
3.4 AG-UI 的事件分类
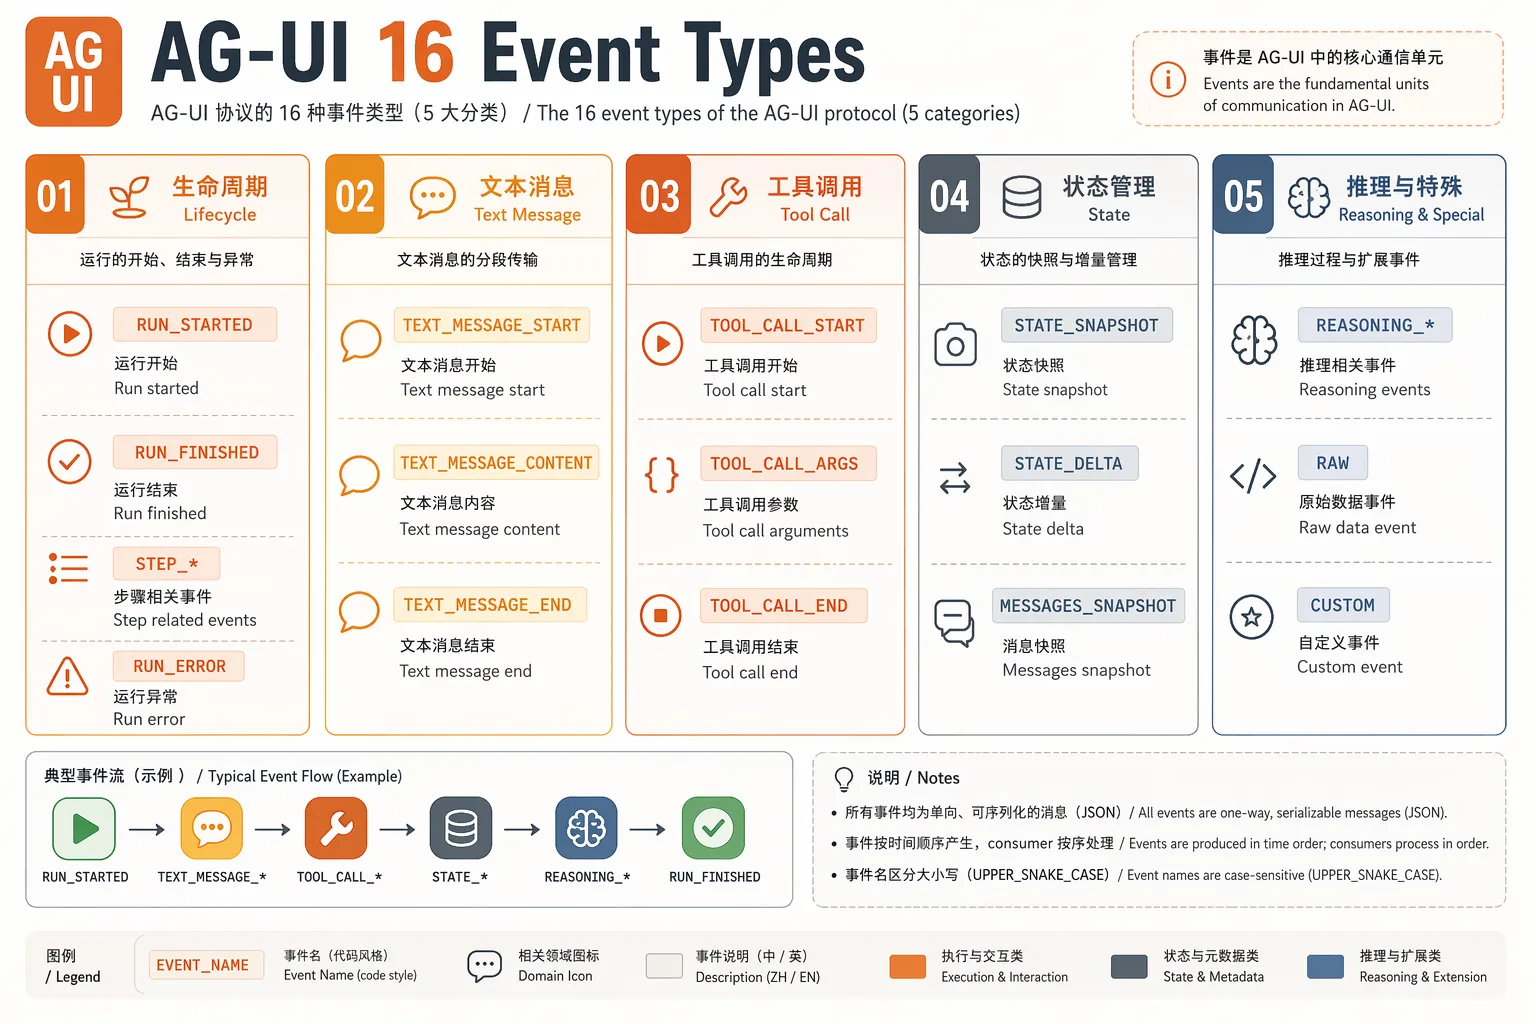
AG-UI 一共 16 个 event type,分 5 类:
| 类别 | 事件 | 用途 |
|---|---|---|
| Lifecycle | RUN_STARTED / RUN_FINISHED / RUN_ERROR / STEP_STARTED / STEP_FINISHED | 一次 agent 调用的生命周期 |
| Text message | TEXT_MESSAGE_START / TEXT_MESSAGE_CONTENT / TEXT_MESSAGE_END | 流式文本(chat 主体) |
| Tool call | TOOL_CALL_START / TOOL_CALL_ARGS / TOOL_CALL_END | agent 调前端 / 后端工具的完整过程 |
| State management | STATE_SNAPSHOT / STATE_DELTA / MESSAGES_SNAPSHOT | 共享状态的完整快照 / 增量 delta(JSON Patch RFC 6902) |
| Reasoning(替代 Thinking) | REASONING_START / REASONING_MESSAGE_* / REASONING_END | chain-of-thought 流(v2 把旧 THINKING_* 都标 deprecated) |
| Special | RAW / CUSTOM | 透传事件、用户自定义事件 |
| Draft | META_EVENT / extended RunFinished | 应用级 annotation、interrupt 感知的扩展 |
3 个事件流模式(这是 AG-UI 设计上很关键的一点):
- Start–Content–End:流式内容(text、tool call)走这种。
- Snapshot–Delta:状态同步走这种——
STATE_SNAPSHOT给全量,STATE_DELTA给 JSON Patch 增量。 - Lifecycle:监控 agent run。
3.5 一次 user input 走过的事件流
sequenceDiagram
  participant U as User
  participant FE as React FE
  participant RT as CopilotKit Runtime
  participant AG as Agent (LangGraph)
  U->>FE: 发送 "把这篇文章的 outline 改得更紧凑"
  FE->>RT: POST /api/copilotkit (AG-UI Run)
  RT->>AG: open AG-UI session
  AG-->>RT: RUN_STARTED
  AG-->>RT: STEP_STARTED
  AG-->>RT: TOOL_CALL_START (name=edit_outline)
  AG-->>RT: TOOL_CALL_ARGS (delta: {section:intro, action:trim})
  AG-->>RT: TOOL_CALL_END
  AG-->>RT: STATE_DELTA (patch to outline)
  AG-->>RT: TEXT_MESSAGE_START
  AG-->>RT: TEXT_MESSAGE_CONTENT (delta: "我把 intro 从 200 字缩到 80 字")
  AG-->>RT: TEXT_MESSAGE_END
  AG-->>RT: STEP_FINISHED
  AG-->>RT: RUN_FINISHED
  RT-->>FE: SSE stream of AG-UI events
  FE->>FE: 重渲染 outline(来自 state delta)
  FE->>U: 文本流 + outline UI 同步更新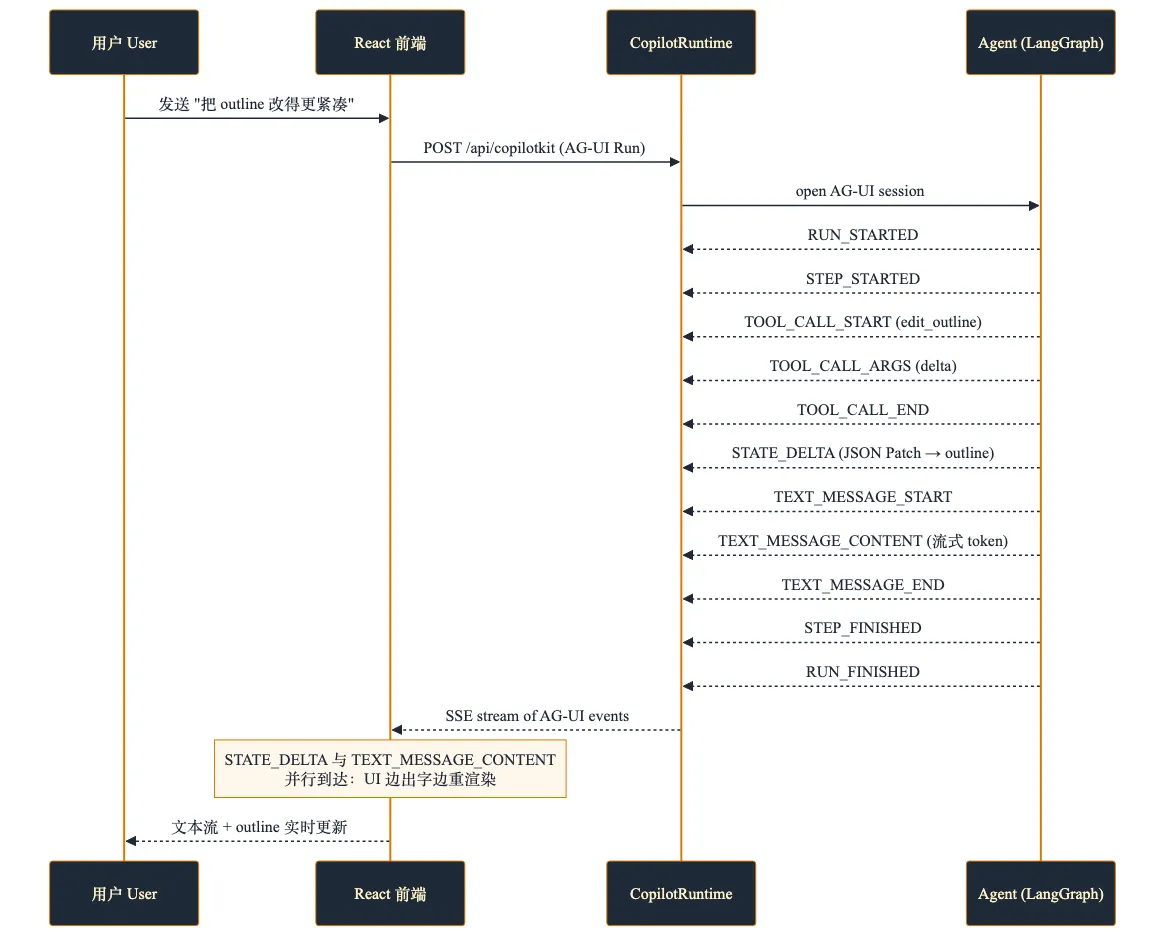
注意 STATE_DELTA(增量)和 TEXT_MESSAGE_CONTENT(增量)是并行的——文本流式输出的同时,状态也在 patch,前端可以根据 STATE_DELTA 实时重渲染”被 agent 改的 outline 组件”。
4. CopilotKit 的三件套架构
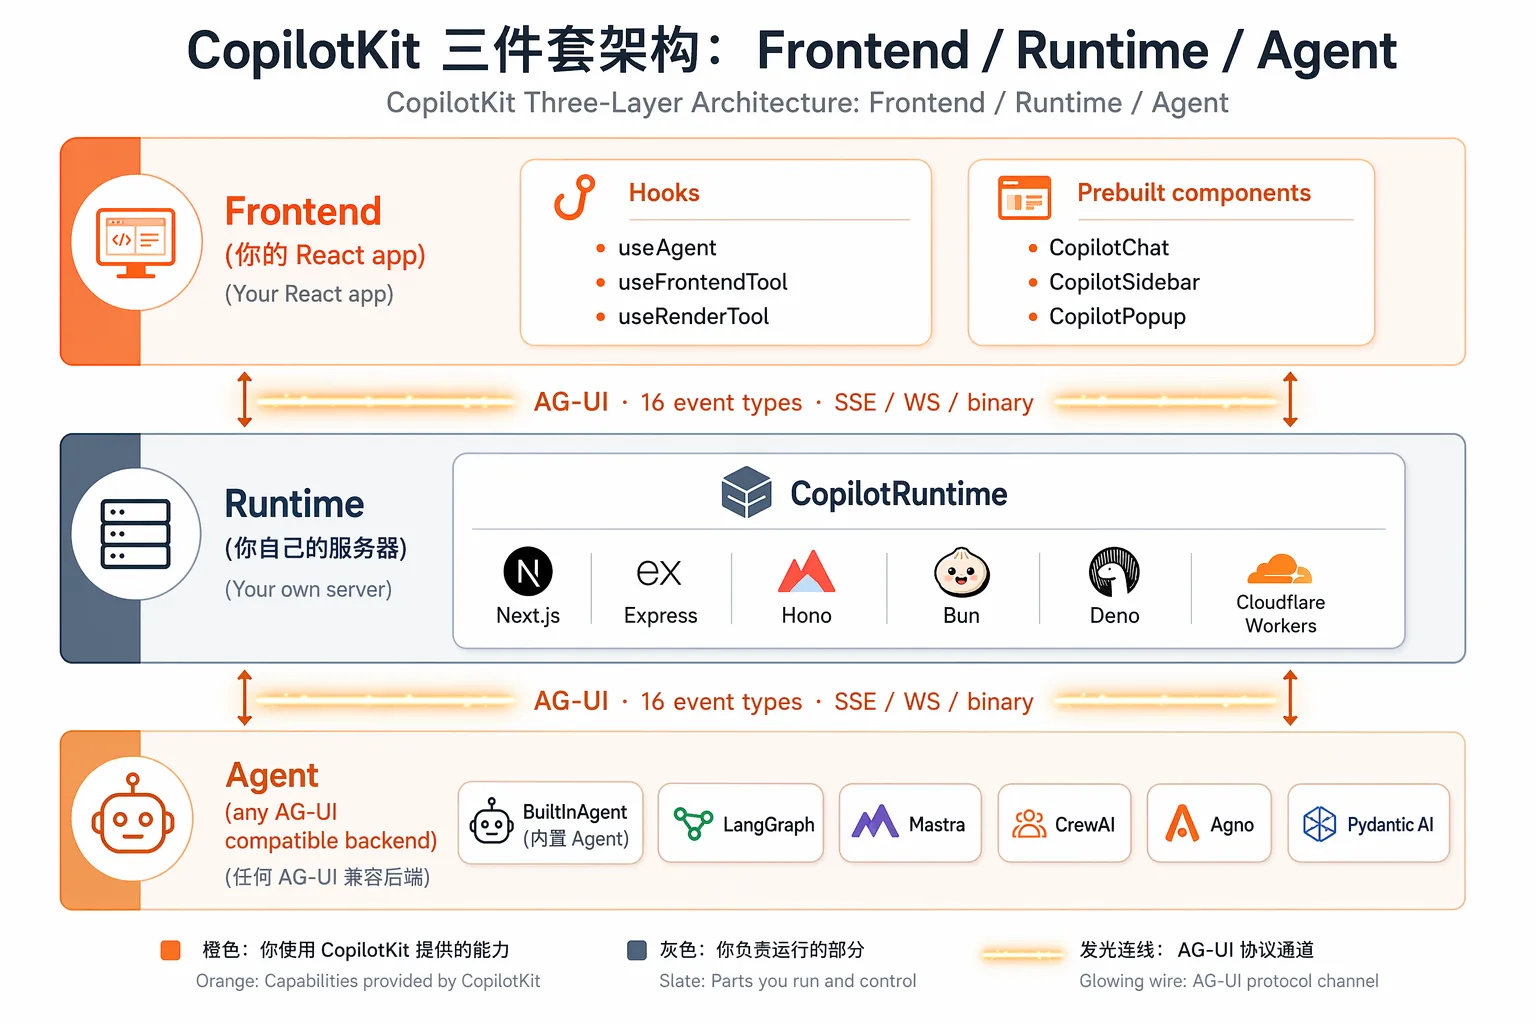
三层的职责:
4.1 Frontend
- Hooks:
useAgent、useFrontendTool、useRenderTool、useHumanInTheLoop、useAgentContext、useConfigureSuggestions等。useAgent是 v2 的核心——既能订阅 agent state,又能调方法(runAgent、subscribe、setState)。 - Prebuilt 组件:
CopilotChat(嵌入式 chat)、CopilotSidebar(侧边栏)、CopilotPopup(浮窗)。开箱即用。 - Headless 模式:以上都不是必须的。完全可以用 hooks 自己拼 UI,prebuilt 只是给”懒得设计 UI”的人。
4.2 Runtime
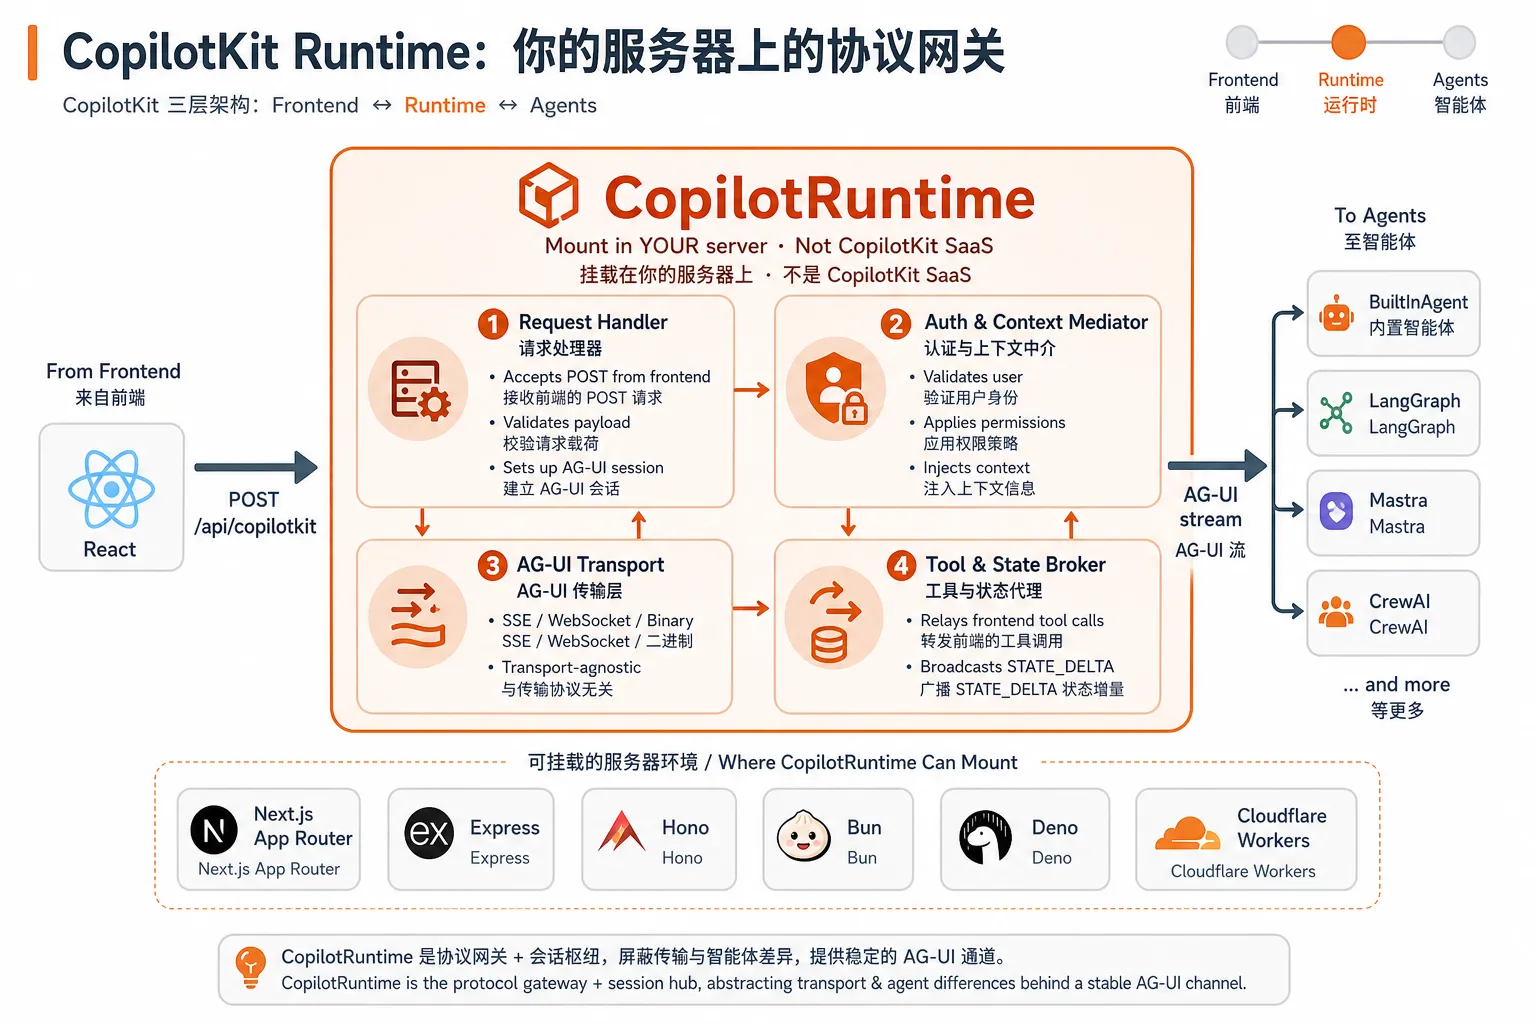
CopilotRuntime 是一个 mount 在你自己服务器上的 request handler:
- 接受前端 POST
- 中介 auth / 权限 / 上下文
- 转发给配置的 agent backend(通过 AG-UI)
- 把 agent 的 stream 转发回前端(SSE / WebSocket / 二进制)
支持 Next.js App Router、Express、Hono、Bun、Deno、Cloudflare Workers。这是你的服务器,不是 CopilotKit 的 SaaS——这点很重要,意味着你不用把 user prompt 发到 Copilot 的服务器去(除非你额外买 Copilot Cloud 的 Threads/Persistence)。
如果选 BuiltInAgent(in-process 模式),runtime 直接在同一进程内运行 agent,连外部 LLM 调用都省了。
4.3 Agent
任何实现 AG-UI 协议的 backend:
- BuiltInAgent:CopilotKit 自带,in-process 跑,适合 demo
- LangGraph(Python / TS / FastAPI):最广泛支持
- Mastra(TS):TypeScript-native
- CrewAI、Agno、Pydantic AI、Microsoft Agent Framework、AWS Strands、Google ADK、LlamaIndex、AG2、AI SDK 全都接进来了
- 你自己的 AG-UI 实现
CopilotKit 的解耦策略:换 backend 改一行配置,前端不动。
// 换 backend 的 diff:只改 runtime 这一段
const runtime = new CopilotRuntime({
  agents: {
    // 上周用 BuiltInAgent
    // default: new BuiltInAgent({ model: "openai:gpt-4o" }),
    // 这周换 LangGraph
    default: new LangGraphHttpAgent({ url: "http://localhost:8000/agent" }),
  },
});
5. 详细组件手册
CopilotKit 1.x → 1.5 → 1.6 这两版做了一次较大的 hook 重命名。v1 用
useCopilotAction、useCoAgent、useCoAgentStateRender,v2 用useFrontendTool、useAgent、useRenderTool。我按 v2 写(也是官方当前推荐),v1 hook 在 deprecated 注释里还能用。
5.1 useAgent — agent 的全功能接口(v2)
import { useAgent } from "@copilotkit/react-core/v2";

const { state, setState, runAgent, subscribe, stop } = useAgent({
  agentId: "travel-planner",
});

// 读 state
console.log(state.tripPlan);

// 写 state(前端直接 set,agent 立即可见)
setState({ tripPlan: { ...state.tripPlan, destination: "Tokyo" } });

// 订阅 event
const unsub = subscribe({ eventTypes: ["STATE_DELTA", "TOOL_CALL_END"] }, (event) => {
  console.log(event);
});

// 主动起一次 run
await runAgent({ messages: [{ role: "user", content: "帮我加一天京都" }] });

// 停止
stop();
这个 hook 在 v2 把 v1 的 useCoAgent(state)+ 单独的 runAgent 合并了。一个 hook 同时管”读 state、写 state、订阅 event、起 run、停 run”。
5.2 useFrontendTool — 让 agent 调前端代码
让 agent 在自己规划时调一个跑在浏览器里的函数——比如把 agent 选中的行高亮、跳到某个段落、触发一个前端 store 更新。
import { useFrontendTool, z } from "@copilotkit/react-core/v2";

useFrontendTool({
  name: "highlightRows",
  description: "在前端把指定 id 的行高亮 1.5 秒。",
  parameters: z.object({
    rowIds: z.array(z.string()).describe("要高亮的行 id"),
  }),
  handler: async ({ rowIds }) => {
    setHighlighted(rowIds);
    await new Promise((r) => setTimeout(r, 1500));
    setHighlighted([]);
    return { ok: true, count: rowIds.length };
  },
});
这个 tool 跑在浏览器,agent 调它时 runtime 会中转——AG-UI 的 TOOL_CALL_* 事件让前端 handler 执行,handler return value 走同样事件流回去。
5.3 useRenderTool / useDefaultRenderTool — tool 的 UI 渲染
当 agent 调一个 tool(无论是前端 tool 还是后端 tool),结果通常应该被渲染成真的 React 组件,而不是塞进 chat 气泡。v2 的 useRenderTool 就是干这个的:
import { useRenderTool, useDefaultRenderTool, z } from "@copilotkit/react-core/v2";

// 1) 给某个特定 tool 注册专属 renderer
useRenderTool(
  {
    name: "get_weather",
    parameters: z.object({ location: z.string() }),
    render: ({ parameters, result, status }) => {
      const loading = status !== "complete";
      return (
        <WeatherCard
          loading={loading}
          location={parameters.location}
          temperature={result?.temperature}
          conditions={result?.conditions}
        />
      );
    },
  },
  []
);

// 2) 给所有"没被认领"的 tool 一个 catch-all
useDefaultRenderTool({
  render: ({ name, parameters, status, result }) => (
    <GenericToolCard name={name} params={parameters} result={result} status={status} />
  ),
}, []);
这就是 Generative UI 的落地:tool 的语义由 agent 决定,tool 的”长什么样”由前端 React 组件决定。Runtime 通过 AG-UI 的 TOOL_CALL_START/ARGS/END 事件把 (tool name, parameters, result, status) 推给前端。
5.4 useHumanInTheLoop — 工具式 HITL
HITL 的第一种 pattern:LLM 决定什么时候暂停。你定义一个前端 tool,让 LLM 在合适的时候调它,UI 上弹一个 form 让用户答。
import { useHumanInTheLoop, useConfigureSuggestions, z } from "@copilotkit/react-core/v2";

function BookingChat() {
  useConfigureSuggestions({
    suggestions: [
      { title: "和 sales 约个 call", message: "请帮我约个 sales 介绍会议" },
      { title: "和 Alice 一对一", message: "约下周和 Alice 的一对一" },
    ],
    available: "always",
  });

  useHumanInTheLoop({
    agentId: "booking-agent",
    name: "book_call",
    description: "问用户选一个时段。",
    parameters: z.object({
      topic: z.string().describe("约什么"),
      attendee: z.string().describe("和谁约"),
    }),
    render: ({ args, status, respond }) => (
      <TimePickerCard
        topic={args?.topic}
        attendee={args?.attendee}
        status={status}
        onSubmit={(result) => respond?.(result)}
      />
    ),
  });

  return <CopilotChat agentId="booking-agent" />;
}
后端在 LangGraph Python 里只需要装 middleware:
from langchain.agents import create_agent
from langchain_openai import ChatOpenAI
from copilotkit import CopilotKitMiddleware

graph = create_agent(
    model=ChatOpenAI(model="gpt-4o"),
    tools=[],
    middleware=[CopilotKitMiddleware()],
)
CopilotKitMiddleware 负责把前端 tool 注册的 schema 透传给 LLM。当 LLM 决定调 book_call,前端就拿到事件、render 出 picker、用户点完之后 respond?.() 走 AG-UI 回流给 agent。
5.5 useInterrupt — Graph 决定什么时候暂停
HITL 的第二种 pattern:graph 自己决定暂停。在 LangGraph 节点里调 interrupt(...):
from langgraph.types import interrupt

def confirm_email_node(state):
    payload = interrupt({
        "question": "确认发这封邮件吗?",
        "preview": state["draft"],
    })
    if not payload.get("approved"):
        return {"cancelled": True}
    return {"sent": True}
前端用 useInterrupt 接这个 payload:
import { useInterrupt, z } from "@copilotkit/react-core/v2";
useInterrupt({
agentId: "mailer",
render: ({ payload, respond }) => (
<ConfirmEmailCard
preview={payload.preview}
onApprove={() => respond({ approved: true })}
onCancel={() => respond({ approved: false })}
/>
),
});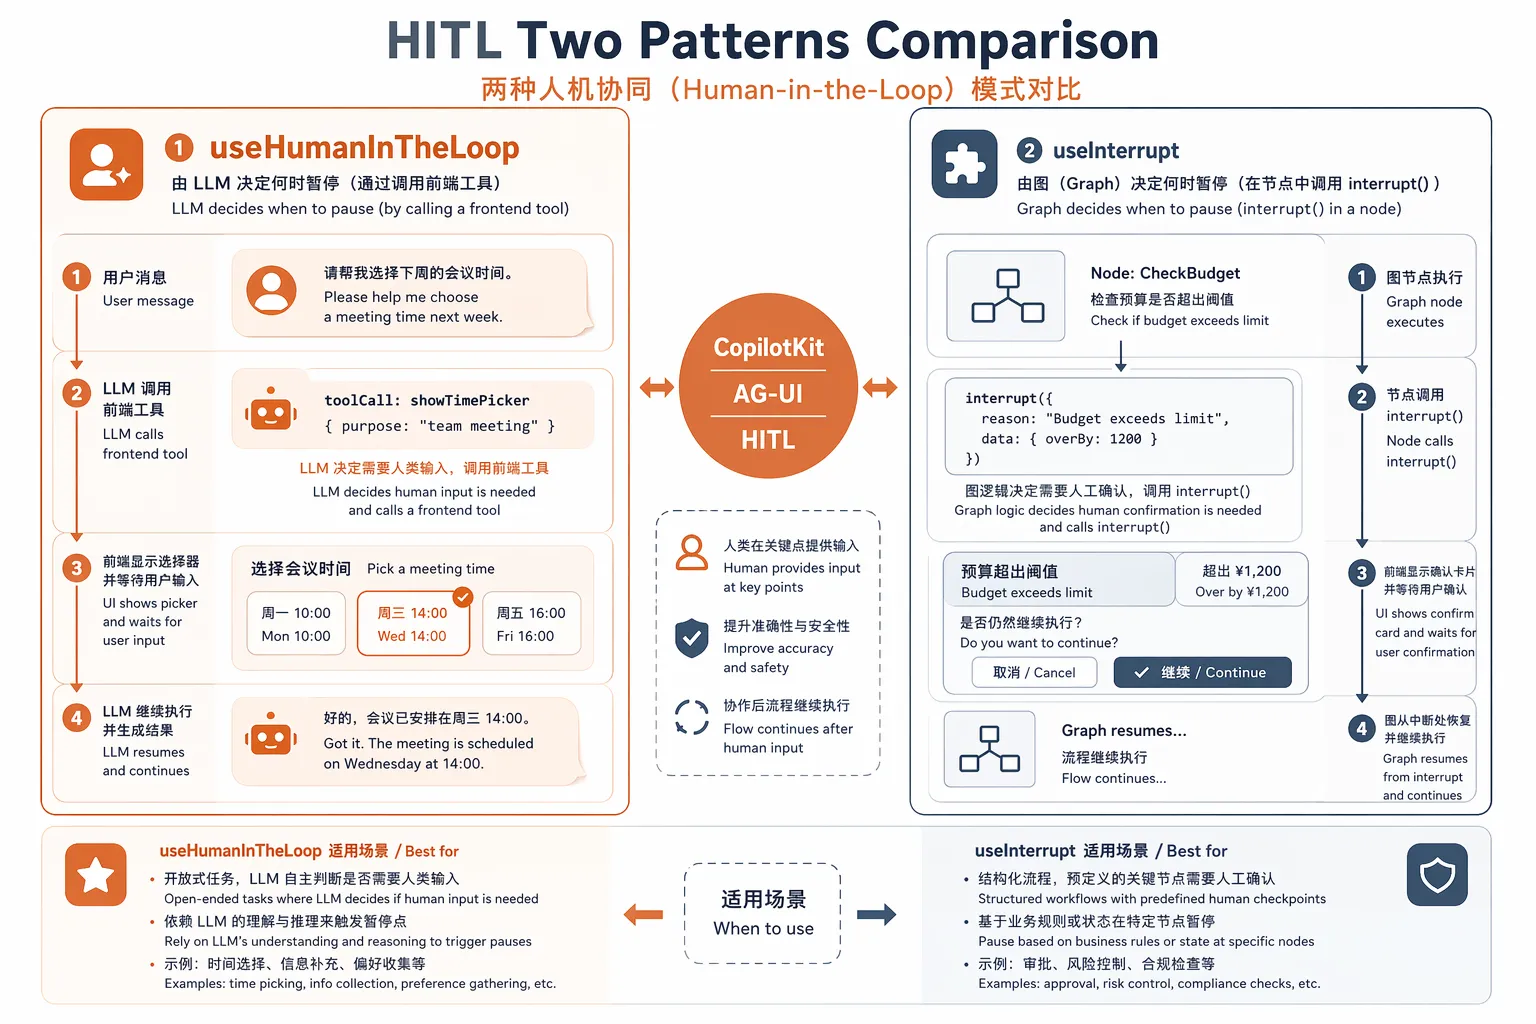 两种 pattern 的区别:
| Pattern | 谁决定暂停 | 后端 surface | 适用 |
|---|---|---|---|
useHumanInTheLoop | LLM(调一个 tool) | 前端定义的 tool schema + render | 高频、可枚举的确认 / 选择 |
useInterrupt | Graph(节点里 interrupt()) | graph 节点 + payload schema | graph 自己知道该不该停、不该被 LLM 二次规划 |
5.6 useAgentContext — 只读上下文(one-way UI→Agent)
当某个值UI 拥有、agent 只读(当前 user、当前 selected record、scroll 位置),用 useAgentContext:
useAgentContext({
  description: "当前用户",
  value: { userId, orgId, role },
});
auto-unregister on unmount。agent 在 system prompt 里就能看到,不用塞到 user message 里重复。
5.7 useConfigureSuggestions — 聊天框的建议 chip
useConfigureSuggestions({
  suggestions: [
    { title: "总结这篇文章", message: "请总结当前 article" },
    { title: "改成更口语", message: "把语气改得更口语" },
  ],
  available: "always",  // 或 "when-idle" / "after-message"
});
比手写一个 useEffect 塞 props 进去省事。
5.8 Prebuilt 组件
CopilotChat— 嵌入式 chat(嵌在页面某处)CopilotSidebar— 侧边栏(push content 那种)CopilotPopup— 浮窗按钮 + 弹出 panelCopilotKit— Provider(必须包根 layout)
v2 全部从 @copilotkit/react-core/v2 导出:
import { CopilotKit, CopilotChat, CopilotSidebar, CopilotPopup } from "@copilotkit/react-core/v2";
import "@copilotkit/react-core/v2/styles.css";
6. Generative UI 的三种 spec
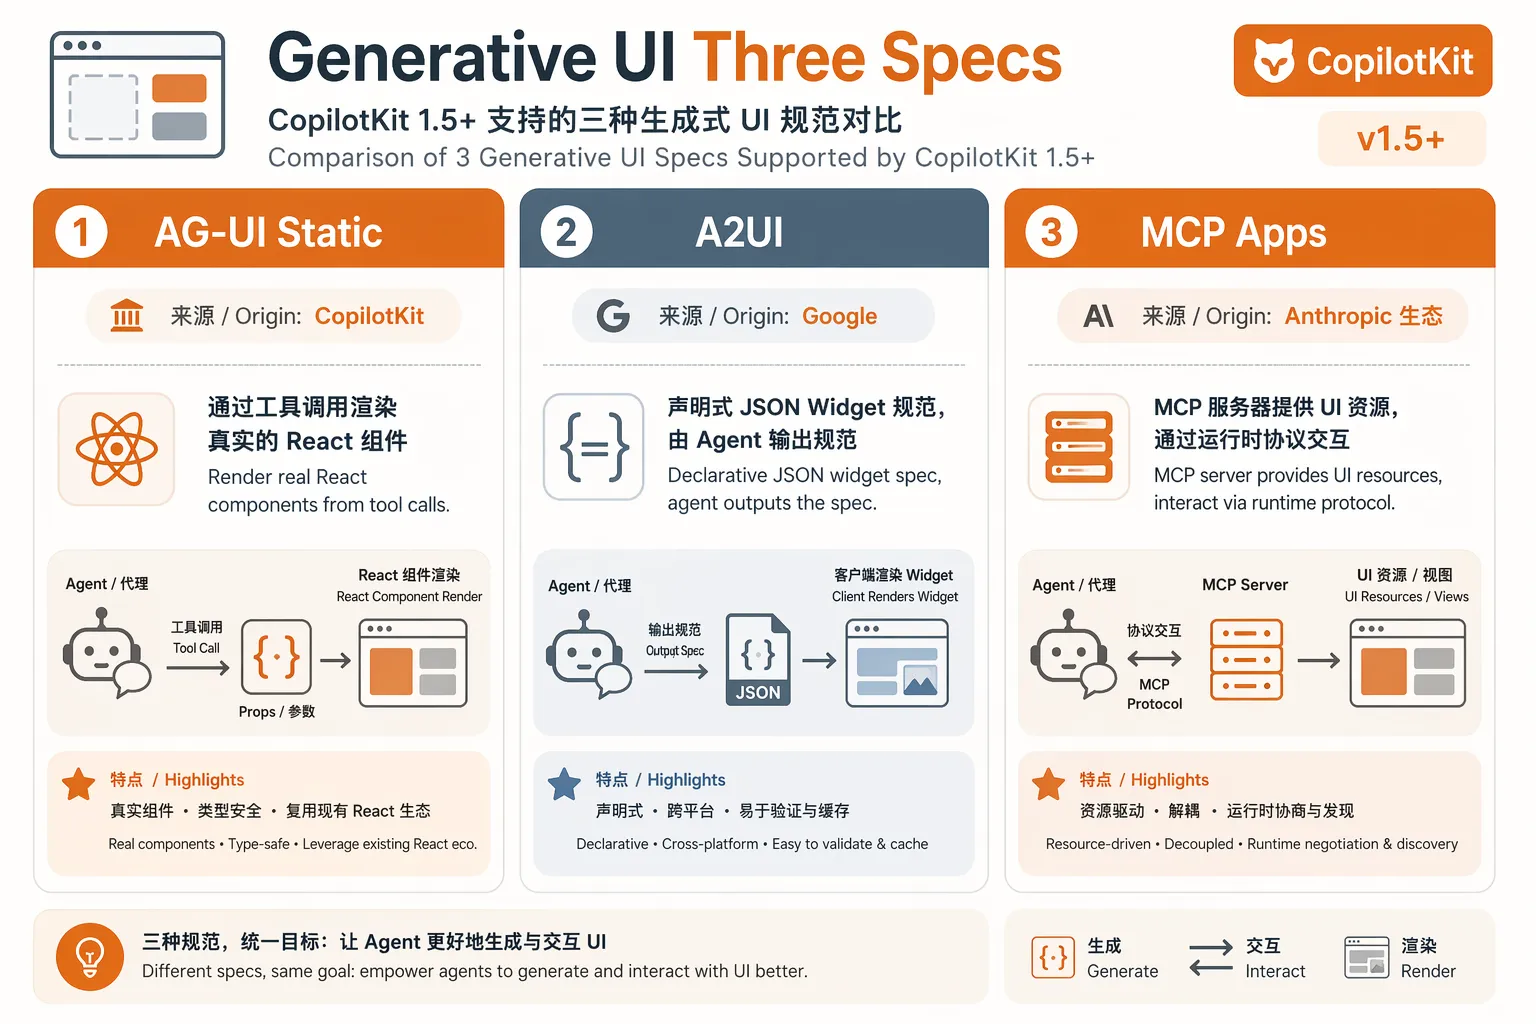
CopilotKit 1.50 起把市面上三个 generative UI spec 都接进来了:
| Spec | 来源 | 定位 | CopilotKit 角色 |
|---|---|---|---|
| AG-UI Static | CopilotKit | 静态组件渲染(agent 决定渲染什么 React 组件) | 一等公民 |
| A2UI | 声明式 widget 规范(agent 输出 JSON spec) | launch partner | |
| MCP Apps | Anthropic 生态 | 通过 MCP server 提供可交互的 UI 资源 | full support |
| Open-JSON-UI | 社区 | 开放的 JSON UI spec | 支持 |
useRenderTool 走的是 AG-UI Static 路线——和 AG-UI runtime 一体。你想接 A2UI 也行,CopilotKit 自带 @copilotkit/a2ui-renderer,把 Google 出的 spec 转成真组件。
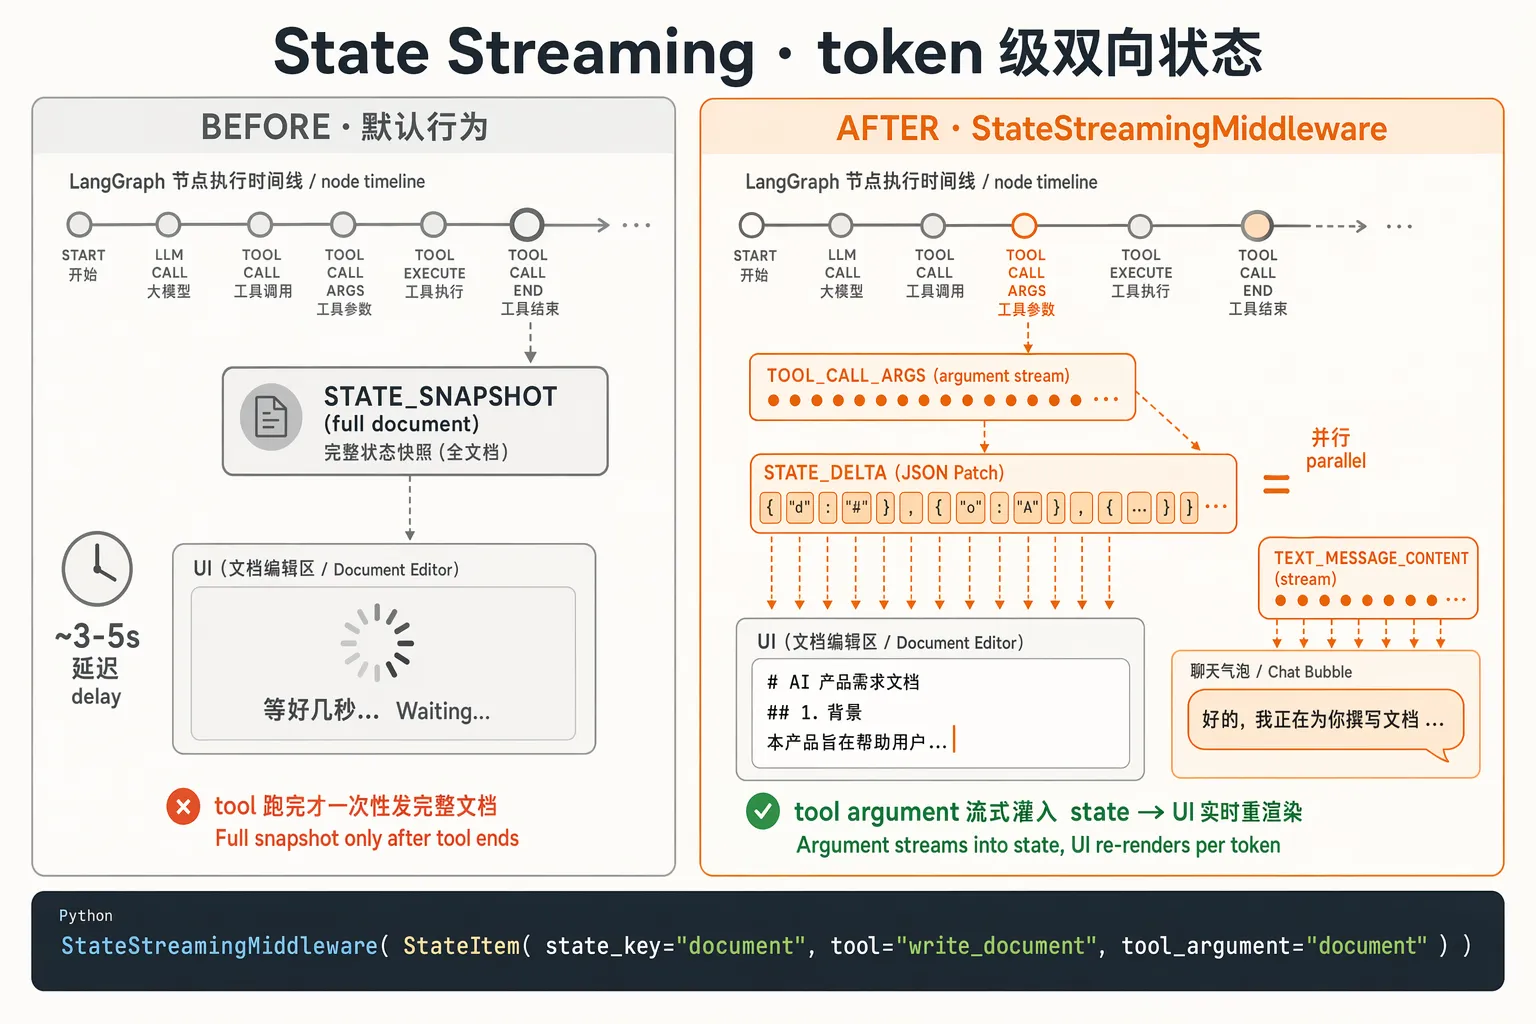
7. State Streaming:token 级的双向 state
如果你在 LangGraph 里有一个 document state,让 agent 用 write_document tool 一边生成一边写。默认行为是:tool call 完成后 STATE_DELTA 一次发完整文档。用户在 chat 里要等好几秒才能看到结果。
StateStreamingMiddleware 把 tool 的某个argument 的 streaming 直接灌进 state——UI 上 token-by-token 看到 agent 写的字:
from langgraph.types import Command
from langchain_core.messages import ToolMessage
from copilotkit import (
    CopilotKitMiddleware,
    StateItem,
    StateStreamingMiddleware,
)

@tool
def write_document(document: str, runtime: ToolRuntime) -> Command:
    """写一个文档。"""
    return Command(update={
        "document": document,
        "messages": [ToolMessage(content="Document written.", tool_call_id=runtime.tool_call_id)],
    })

graph = create_agent(
    model=ChatOpenAI(model="gpt-4o"),
    tools=[write_document],
    middleware=[
        CopilotKitMiddleware(),
        StateStreamingMiddleware(
            StateItem(
                state_key="document",          # 推到 state["document"]
                tool="write_document",         # 监听这个 tool
                tool_argument="document",      # 取这个 argument 的 streaming
            )
        ),
    ],
    state_schema=AgentState,
)关键约束:tool argument 名必须和 state_key 相同,否则前端 usePredictStateSubscription 没法对到。
8. 竞品地图
把最常被拿来比的项目列出来:
| 项目 | 层 | 哲学 | 最强项 | 最弱项 |
|---|---|---|---|---|
| CopilotKit + AG-UI | L2 + L5 | Bundle:协议 + UI 全包 | 跨 framework、协议中立、generative UI + HITL + shared state 闭环 | 协议升级时第三方跟进有 lag;headless 想自管 UI 时 bundle 偏重 |
| Vercel AI SDK | L3/L4 | 底层 SDK,自由拼 | 多 provider 抽象、流式 UI primitives、最轻 | 没有 agent 协议、没有 native shared state / HITL 闭环 |
| assistant-ui | L5 | Headless 优先,UI 你自己拼 | 真正的 headless、customizable、shadcn 风格 | 没有自带 protocol、靠各家 framework 推 stream、自己实现 HITL |
| LangGraph Studio | L3 | LangChain 官方调试器 | LangGraph 可视化、debug 友好 | 不是产品里的 UI,是开发工具;不能嵌进业务 app |
| Mastra | L3 + L5 | TS-native 端到端 | TypeScript 一把梭、自带 memory/workflows | 生态比 LangGraph 小、跨 L2 的能力弱 |
| OpenAI AgentKit | L3 + L5 | OpenAI 自家 | 与 OpenAI 模型深度集成 | 只为 OpenAI 模型设计、跨 provider 难 |
| Microsoft Agent Framework | L3 | .NET / Python | enterprise integration | UI 一侧比较薄 |
| AG2 / AutoGen | L3 | 学术派 multi-agent | 多 agent 协作、消息协议 | UI 一侧几乎全靠你自己 |
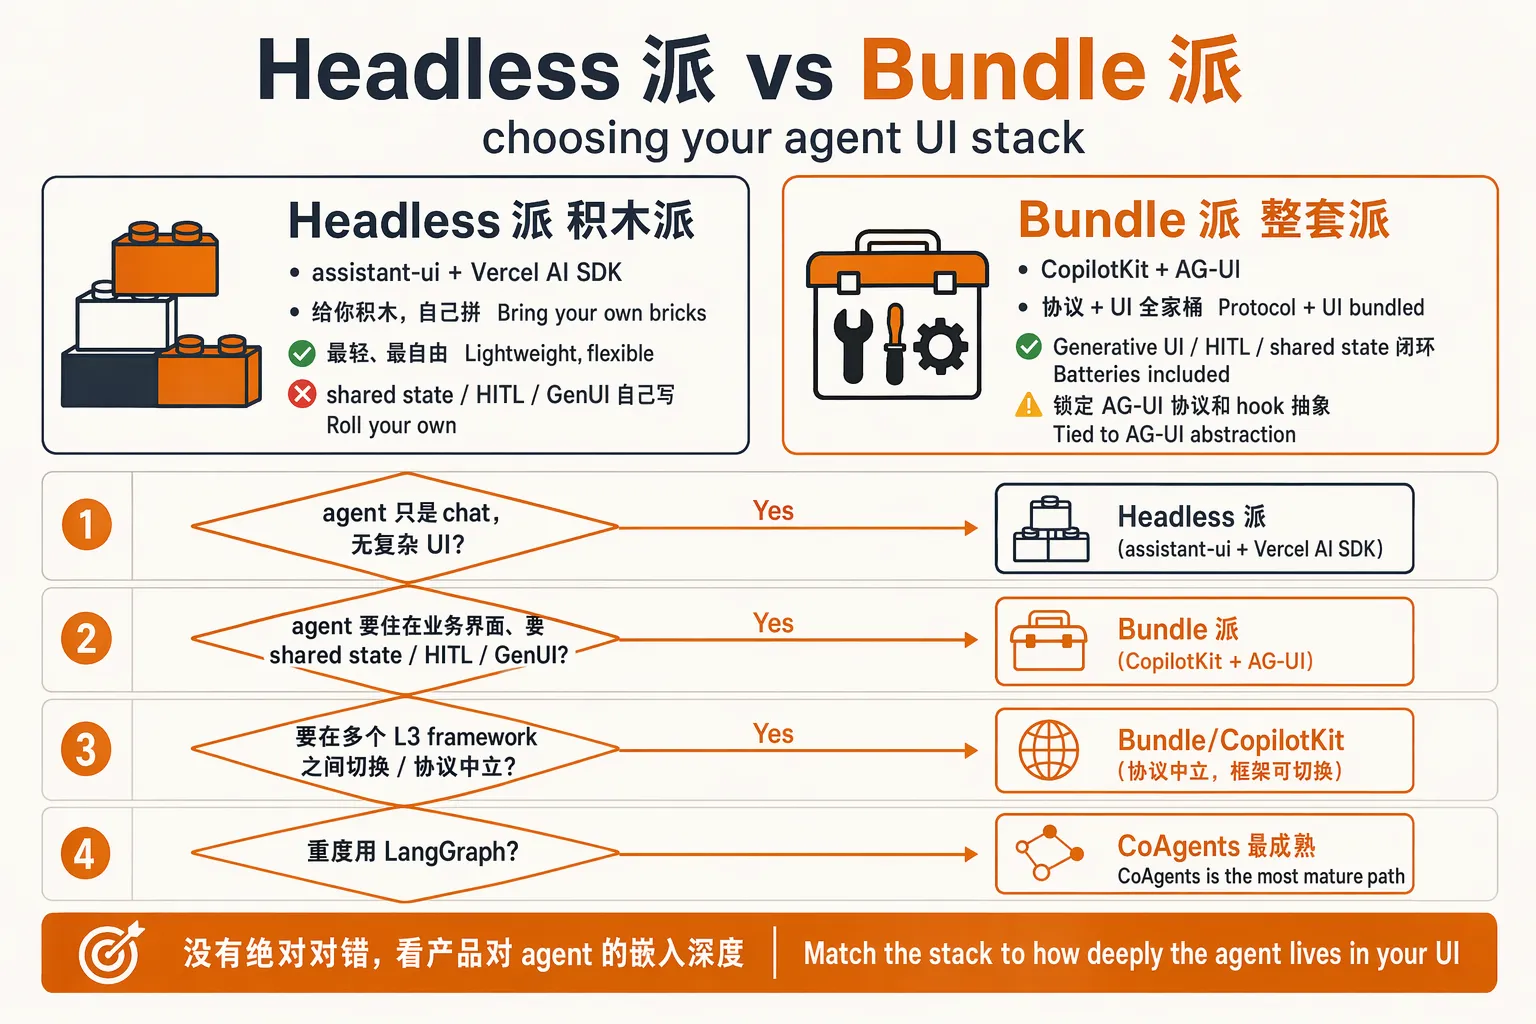
Headless 派 vs Bundle 派:
- Headless 派(assistant-ui + Vercel AI SDK)——给你积木,你自己拼。你想要 shared state 双向同步、HITL 自动 UI、Generative UI 全套,要自己写。
- Bundle 派(CopilotKit)——给你整套。代价是锁定 AG-UI 协议和它的 hook 抽象。
判断标准:
- 你的 agent 只是 chat,没有复杂 UI → headless 派。
- 你的 agent 要”住在”业务界面里、要 shared state、要 HITL、要 generative UI → bundle 派。
- 你打算在不同 L3 framework 之间切换(LangGraph → Agno → 自家实现)→ CopilotKit,因为协议中立。
- 你重度用 LangGraph → CoAgents 这条路最成熟。
9. Demo A:Built-in Agent,10 分钟
路径选Built-in Agent——in-process 跑,0 依赖外部服务,只需要 OpenAI key。
我已经在本地用 Next.js 16.2.9 + CopilotKit 1.60.1 实测跑过一遍(见 附录 A),下面是最小可跑代码。
9.1 初始化
npx create-next-app@latest my-copilot-app --typescript --tailwind --app --use-npm
cd my-copilot-app
npm install @copilotkit/react-core @copilotkit/react-ui @copilotkit/runtime
9.2 配 env
.env:
OPENAI_API_KEY=sk-...9.3 app/api/copilotkit/route.ts
这是 runtime 入口。BuiltInAgent 在同一进程内运行:
import {
  CopilotRuntime,
  copilotRuntimeNextJSAppRouterEndpoint,
} from "@copilotkit/runtime";
import { BuiltInAgent } from "@copilotkit/runtime/v2";
import { NextRequest } from "next/server";

const builtInAgent = new BuiltInAgent({
  model: "openai:gpt-4o",
});

const runtime = new CopilotRuntime({
  agents: { default: builtInAgent },
});

export const POST = async (req: NextRequest) => {
  const { handleRequest } = copilotRuntimeNextJSAppRouterEndpoint({
    runtime,
    endpoint: "/api/copilotkit",
  });
  return handleRequest(req);
};
9.4 app/layout.tsx — Provider
import { CopilotKit } from "@copilotkit/react-core/v2";
import "@copilotkit/react-core/v2/styles.css";
import "./globals.css";

export default function RootLayout({ children }: { children: React.ReactNode }) {
  return (
    <html lang="en">
      <body className="antialiased">
        <CopilotKit runtimeUrl="/api/copilotkit">
          {children}
        </CopilotKit>
      </body>
    </html>
  );
}
9.5 app/page.tsx — Sidebar
import { CopilotSidebar } from "@copilotkit/react-core/v2";

export default function Page() {
  return (
    <main className="min-h-screen p-8">
      <h1 className="text-2xl font-semibold">CopilotKit Built-in Agent Demo</h1>
      <p className="mt-2 text-sm text-neutral-600">
        右侧 Sidebar 就是 CopilotSidebar;底层的 CopilotKit 已经在 layout 里包好了。
      </p>
      <CopilotSidebar />
    </main>
  );
}
9.6 启动
npm run dev打开 http://localhost:3000 就看到右侧 sidebar。问”Can you tell me a joke?”,LLM 直接答。
9.7 加一个 frontend tool
把 page.tsx 改成:
"use client";
import { CopilotSidebar, useFrontendTool, z } from "@copilotkit/react-core/v2";
import { useState } from "react";

export default function Page() {
  const [highlight, setHighlight] = useState<string | null>(null);
  return (
    <main className="min-h-screen p-8">
      <h1 className={`text-2xl font-semibold ${highlight ? "text-orange-600" : ""}`}>
        标题(agent 可以高亮我)
      </h1>
      <CopilotSidebar />
      <Highlighter setHighlight={setHighlight} />
    </main>
  );
}

function Highlighter({ setHighlight }: { setHighlight: (s: string | null) => void }) {
  useFrontendTool({
    name: "highlight_title",
    description: "把页面顶部标题高亮 1.5 秒。",
    parameters: z.object({
      reason: z.string().describe("为什么高亮,例如 '答对了'" }),
    }),
    handler: async ({ reason }) => {
      setHighlight(reason);
      await new Promise((r) => setTimeout(r, 1500));
      setHighlight(null);
      return { highlighted: true };
    },
  });
  return null;
}
现在让 agent 自己决定什么时候调这个 tool——比如问”如果我答对了一道数学题,请高亮标题表示奖励”,LLM 就会调 highlight_title,前端标题变成橙色,1.5 秒后恢复。
10. Demo B:CopilotKit + LangGraph backend,30-60 分钟
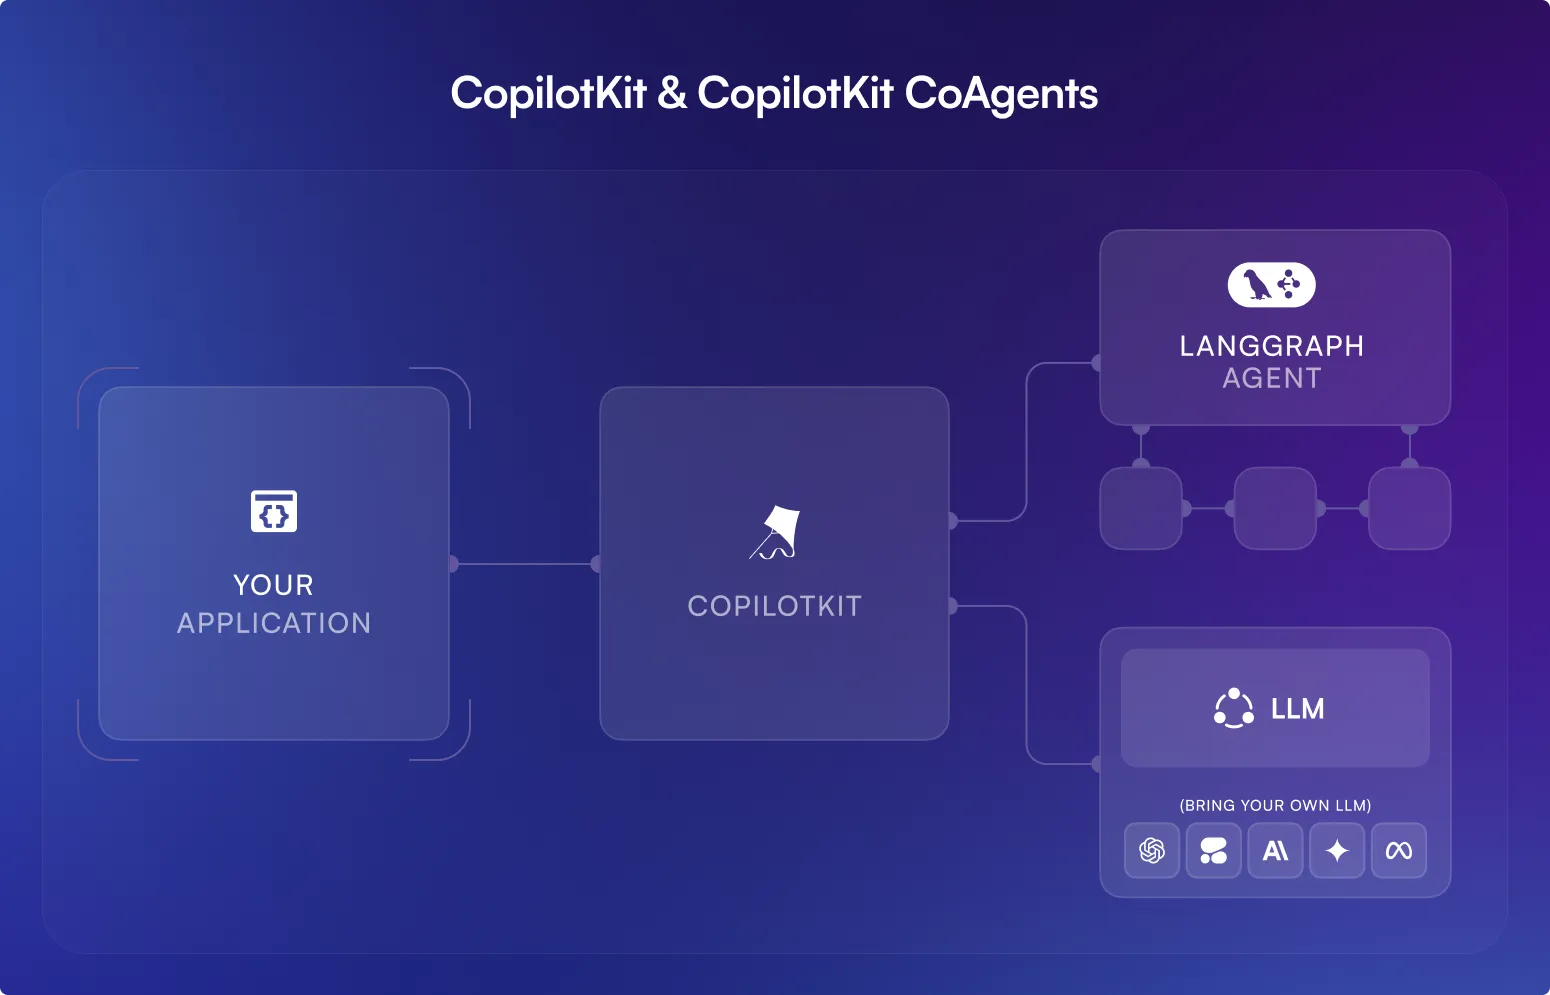
这个 demo 演示协议层的真正力量——前端是 CopilotKit,agent 跑在独立 Python LangGraph 服务里。
10.1 用官方 CLI scaffold
npx copilotkit@latest create
# 按提示:
#   Project name: my-langgraph-app
#   Enterprise Intelligence Platform: No (先不上 Copilot Cloud)
#   Framework: LangGraph (Python)
CLI 会 scaffold 一个 monorepo,目录大概长这样:
my-langgraph-app/
├── agent/                  # Python LangGraph 服务
│   ├── pyproject.toml      # uv 管依赖
│   ├── langgraph.json
│   └── src/agent.py
├── ui/                     # Next.js 前端
│   ├── package.json
│   ├── app/
│   │   ├── api/copilotkit/route.ts
│   │   ├── layout.tsx
│   │   └── page.tsx
│   └── ...
└── package.json            # workspace 根
agent/src/agent.py 里就是标准 LangGraph,CopilotKitMiddleware 把所有前端 tool 透传给 LLM。
10.2 一个写文档的 agent
import uuid
from langchain.agents import AgentState as BaseAgentState, create_agent
from langchain.tools import ToolRuntime, tool
from langchain_core.messages import ToolMessage
from langchain_openai import ChatOpenAI
from langgraph.types import Command
from copilotkit import (
    CopilotKitMiddleware,
    StateItem,
    StateStreamingMiddleware,
)

class AgentState(BaseAgentState):
    document: str

@tool
def write_document(document: str, runtime: ToolRuntime) -> Command:
    """写一个文档。每次写都用这个 tool,document 参数会流式进 shared state。"""
    return Command(update={
        "document": document,
        "messages": [ToolMessage(
            content="Document written to shared state.",
            name="write_document",
            id=str(uuid.uuid4()),
            tool_call_id=runtime.tool_call_id,
        )],
    })

graph = create_agent(
    model=ChatOpenAI(model="gpt-4o"),
    tools=[write_document],
    middleware=[
        CopilotKitMiddleware(),
        StateStreamingMiddleware(
            StateItem(state_key="document", tool="write_document", tool_argument="document")
        ),
    ],
    state_schema=AgentState,
    system_prompt=(
        "You are a collaborative writing assistant. When the user asks you to write, "
        "draft, or revise any piece of text, ALWAYS call `write_document` with the full "
        "content in the `document` argument. Never paste the document in chat directly."
    ),
)
10.3 前端:读 + 渲染 shared state
"use client";
import { CopilotChat, useAgent } from "@copilotkit/react-core/v2";
import { Card, CardContent, CardHeader, CardTitle } from "@/components/ui/card";

export default function Page() {
  return (
    <CopilotKit runtimeUrl="/api/copilotkit" agent="default">
      <div className="flex h-screen">
        <div className="flex-1 p-8 overflow-y-auto">
          <DocumentView />
        </div>
        <div className="w-[420px] border-l">
          <CopilotChat agent="default" className="h-full" />
        </div>
      </div>
    </CopilotKit>
  );
}

function DocumentView() {
  const { state } = useAgent({ agentId: "default" });
  return (
    <Card>
      <CardHeader>
        <CardTitle>Document (live from agent state)</CardTitle>
      </CardHeader>
      <CardContent>
        <pre className="whitespace-pre-wrap text-sm">
          {state?.document || "等 agent 写…"}
        </pre>
      </CardContent>
    </Card>
  );
}
现在问”帮我写一首关于 AG-UI 协议的七言绝句”,你会看到右侧 chat 在流式输出 token,同时左侧 Card 也在流式更新这首诗——是同一个 state.document 的两个 view,因为 StateStreamingMiddleware 把 write_document 的 document 参数 token-by-token 推给前端。
10.4 启动
# 根目录
npm run dev
# 这会同时启动:
#   - UI  dev server    (Next.js, 默认 3000)
#   - Agent dev server  (langgraph dev,  默认 8123)
打开 http://localhost:3000,UI 通过 /api/copilotkit 这个 Next.js route 把请求转发给 http://localhost:8123 的 LangGraph。
如果想换到 production 部署(你的 LangGraph 不在本地):
// ui/app/api/copilotkit/route.ts
const runtime = new CopilotRuntime({
  agents: {
    default: new LangGraphHttpAgent({ url: "https://my-langgraph.example.com/agent" }),
  },
});
前端一行不用动。
10.5 对比两个 demo
| 维度 | Demo A (Built-in Agent) | Demo B (LangGraph backend) |
|---|---|---|
| 启动时间 | 10 分钟 | 30-60 分钟(多一个 Python 服务) |
| agent 在哪 | 同 Node 进程 | 独立 Python 进程 |
| 适合场景 | demo、纯 chat、个人工具 | 真正生产 agent、多语言 stack |
| 协议层价值 | 看不出来 | 一目了然——换 backend 改一行 |
| Shared state 流式 | 不支持 | 支持(StateStreamingMiddleware) |
| HITL 完整 | 只支持 useHumanInTheLoop | 两种都支持(含 useInterrupt) |
关键判断:CopilotKit 在 Demo A 看起来就是 “Vercel AI SDK 套了层 chat 组件”——这是错觉。Demo B 才把协议层的价值显出来:你今天在 Node 进程里跑 BuiltInAgent,下周拆出 Python LangGraph 服务,前端一行不动。这种迁移在 Vercel AI SDK / assistant-ui 这边要重写一遍 chat client。
11. 关键判断 / 收尾
为什么是 CopilotKit 在做这件事,而不是别人:
- 时机:2024 年 agent framework 井喷,到 2025 年 L3 已经被 LangGraph / Agno / Mastra 切完了,剩下没人填的层就是 L2 + L5
- 定位:他们不是想做”最好的 agent framework”,而是想做”agent framework 的最大公约数”
- 押注:把协议(AG-UI)和 reference impl(CopilotKit)一起开源,赌的是”如果所有 framework 都接 AG-UI,CopilotKit 就是默认前端”
- 商业化靠 Copilot Cloud(threads、persistence、observability、guardrails)——enterprise 卖 SaaS,OSS 留住开发者
生态张力:CopilotKit 想中立,但同时也想当默认 client。这个张力会在 2026-2027 越来越明显——如果 LangGraph 自己做一套 AG-UI 兼容的 client(已经有 LangGraph Studio),CopilotKit 的”唯一 reference impl”地位就会松动。
接下来看什么:
- AG-UI 的 event type 数(16 → ?)和 backward compat 节奏
- CopilotKit 1.6 → 2.0 何时合并 v1/v2 hook
- Mastra / Agno 的前端策略:会不会也搞自己的一套协议
- Anthropic 的 MCP Apps 能不能和 AG-UI 共享一个 event 模型
回到开头:以前是”agent 跑得怎么样”(模型 + orchestration 性能),现在变成”agent 能不能住进你的产品里”(UI + 协议 + shared state)。CopilotKit + AG-UI 是把后一个问题的工程答案显式地摆出来——不是靠”智能体将重塑一切”这种判断,而是靠一份 16 个 event type 的协议规范。
附录 A — Demo 实测日志:
我本机在 /tmp/copilotkit-verify/built-in-agent 用 Next.js 16.2.9 (Turbopack) + CopilotKit 1.60.1 跑过 Demo A:
npx create-next-app@latest built-in-agent→ 1m 装 357 个包npm install @copilotkit/react-core @copilotkit/react-ui @copilotkit/runtime→ 2m 装 787 个包- 写
route.ts/layout.tsx/page.tsx npx tsc --noEmit→ 通过,零类型错误npx next dev -p 3010→ Ready in 457msGET /→ HTTP 200,43KB- 页面 chunks 里包含
node_modules_@ag-ui_client、node_modules_@copilotkit_core、node_modules_@copilotkit_a2ui-renderer、node_modules_@a2ui_web_core等——证明 AG-UI 客户端和 A2UI renderer 真的被加载
要真聊起来 agent,得在 .env 里换上一个真实的 OPENAI_API_KEY。runtime 起来后 POST /api/copilotkit 返回 400(因为没传合法 request body),这恰好证明 route 挂上了、CopilotKit runtime 启动了,只是没真的在聊。
附录 B — 参考资料:
- 官方站:https://www.copilotkit.ai/
- 协议站:https://ag-ui.com/,https://docs.ag-ui.com/
- 架构总览:https://docs.copilotkit.ai/concepts/architecture
- Built-in Agent quickstart:https://docs.copilotkit.ai/built-in-agent/quickstart
- LangGraph Python quickstart:https://docs.copilotkit.ai/langgraph-python/quickstart
- HITL 详解:https://docs.copilotkit.ai/langgraph-python/human-in-the-loop
- Shared state 详解:https://docs.copilotkit.ai/langgraph-python/shared-state
- Generative UI tool rendering:https://docs.copilotkit.ai/langgraph-python/generative-ui/tool-rendering
- AG-UI events:https://docs.ag-ui.com/concepts/events
- AG-UI architecture:https://docs.ag-ui.com/concepts/architecture
- AG-UI vs MCP / A2A 关系:https://www.copilotkit.ai/ag-ui
- GitHub:https://github.com/copilotkit/copilotkit,https://github.com/ag-ui-protocol/ag-ui
- 中文圈介绍:https://juejin.cn/post/7506349526942466083,https://www.cnblogs.com/dc-s/p/18755071
- 第三方对比:https://yourgpt.ai/blog/comparison/copilot-sdk-vs-vercel-ai-sdk,https://medium.com/@akshaychame2/the-complete-guide-to-generative-ui-frameworks-in-2026-fde71c4fa8cc